
How I maxed out my Internet
From Lag Spikes to Zero Latency
☝️Before you even start reading, test your connection right now:
https://www.waveform.com/tools/bufferbloat
If it’s A+, congratulations, you can skip this post.
But if not, then “Much to learn, you still have“.
Welcome back! In my previous post, I detailed the process of building My Own Legendary Custom-built OpenWrt Router. It’s a beast of a little machine, offering way more processing power than typical consumer gear.
But raw CPU power is only potential until you actually configure it. Today, I’m sharing the results of putting this setup to the test on my 300/20 Mbps DOCSIS (Cable) connection.
(Long story short: I pay for this because even the gigabit package offers only max 50 Mbps up - in theory. And up is important to me. The main problem is that there is walkway between the street and my house. And you guessed correctly, the ISP only provides Internet on the street. Because of this any network upgrade means “infrastructure investment” from ISP point of view, what they are willing to do for entire city blocks, but not for my house only… And to be honest I can live with this so far…)
Now back to the topic. The journey required troubleshooting both physical hardware and tweaking advanced software software settings, but the destination is incredible network stability.
The Real Enemy: Jitter and Bufferbloat
When I first set up the network, my baseline ping was surprisingly high. I am using two Deco units for wireless coverage, and initially, they were linked together wirelessly. The solution was simple but essential: I ran an Ethernet cable between the Deco units for a wired backhaul. This immediately dropped the baseline ping, providing a solid foundation for the rest of the tuning.
The next issue became apparent during heavy usage: Jitter.
While “Ping” is the time it takes for a signal to travel to a server and back, “Jitter” is the variance in that time. If your ping is 20ms one second, then spikes to 150ms the next, that’s high jitter.
In the real world, high jitter is what makes remote work unbearable. It’s the cause of those moments in Microsoft Teams calls where everyone’s video freezes for three seconds and then speeds up like chipmunks to catch up. It’s what causes “rubber-banding” in online gaming. My network had plenty of power, but under load, it was unstable.
The Solution: SQM Cake and Precision Tuning
The cure for jitter and network spikes under load is Smart Queue Management (SQM). I used the modern “Cake” algorithm built into OpenWrt.
The goal of SQM is to prevent your cable modem’s internal buffers from filling up (a phenomenon known as “bufferbloat”) when you max out your connection. To do this, you have to throttle your connection slightly so that the Raspberry Pi controls the traffic queue, not the dumb modem.
My Configuration Strategy:
The 90% Rule: I set Cake to limit traffic to roughly 90% of my advertised bandwidth (Targeting approx. 270 Mbps down / 18 Mbps up). This leaves just enough overhead to ensure traffic flows smoothly without hitting the modem’s wall.
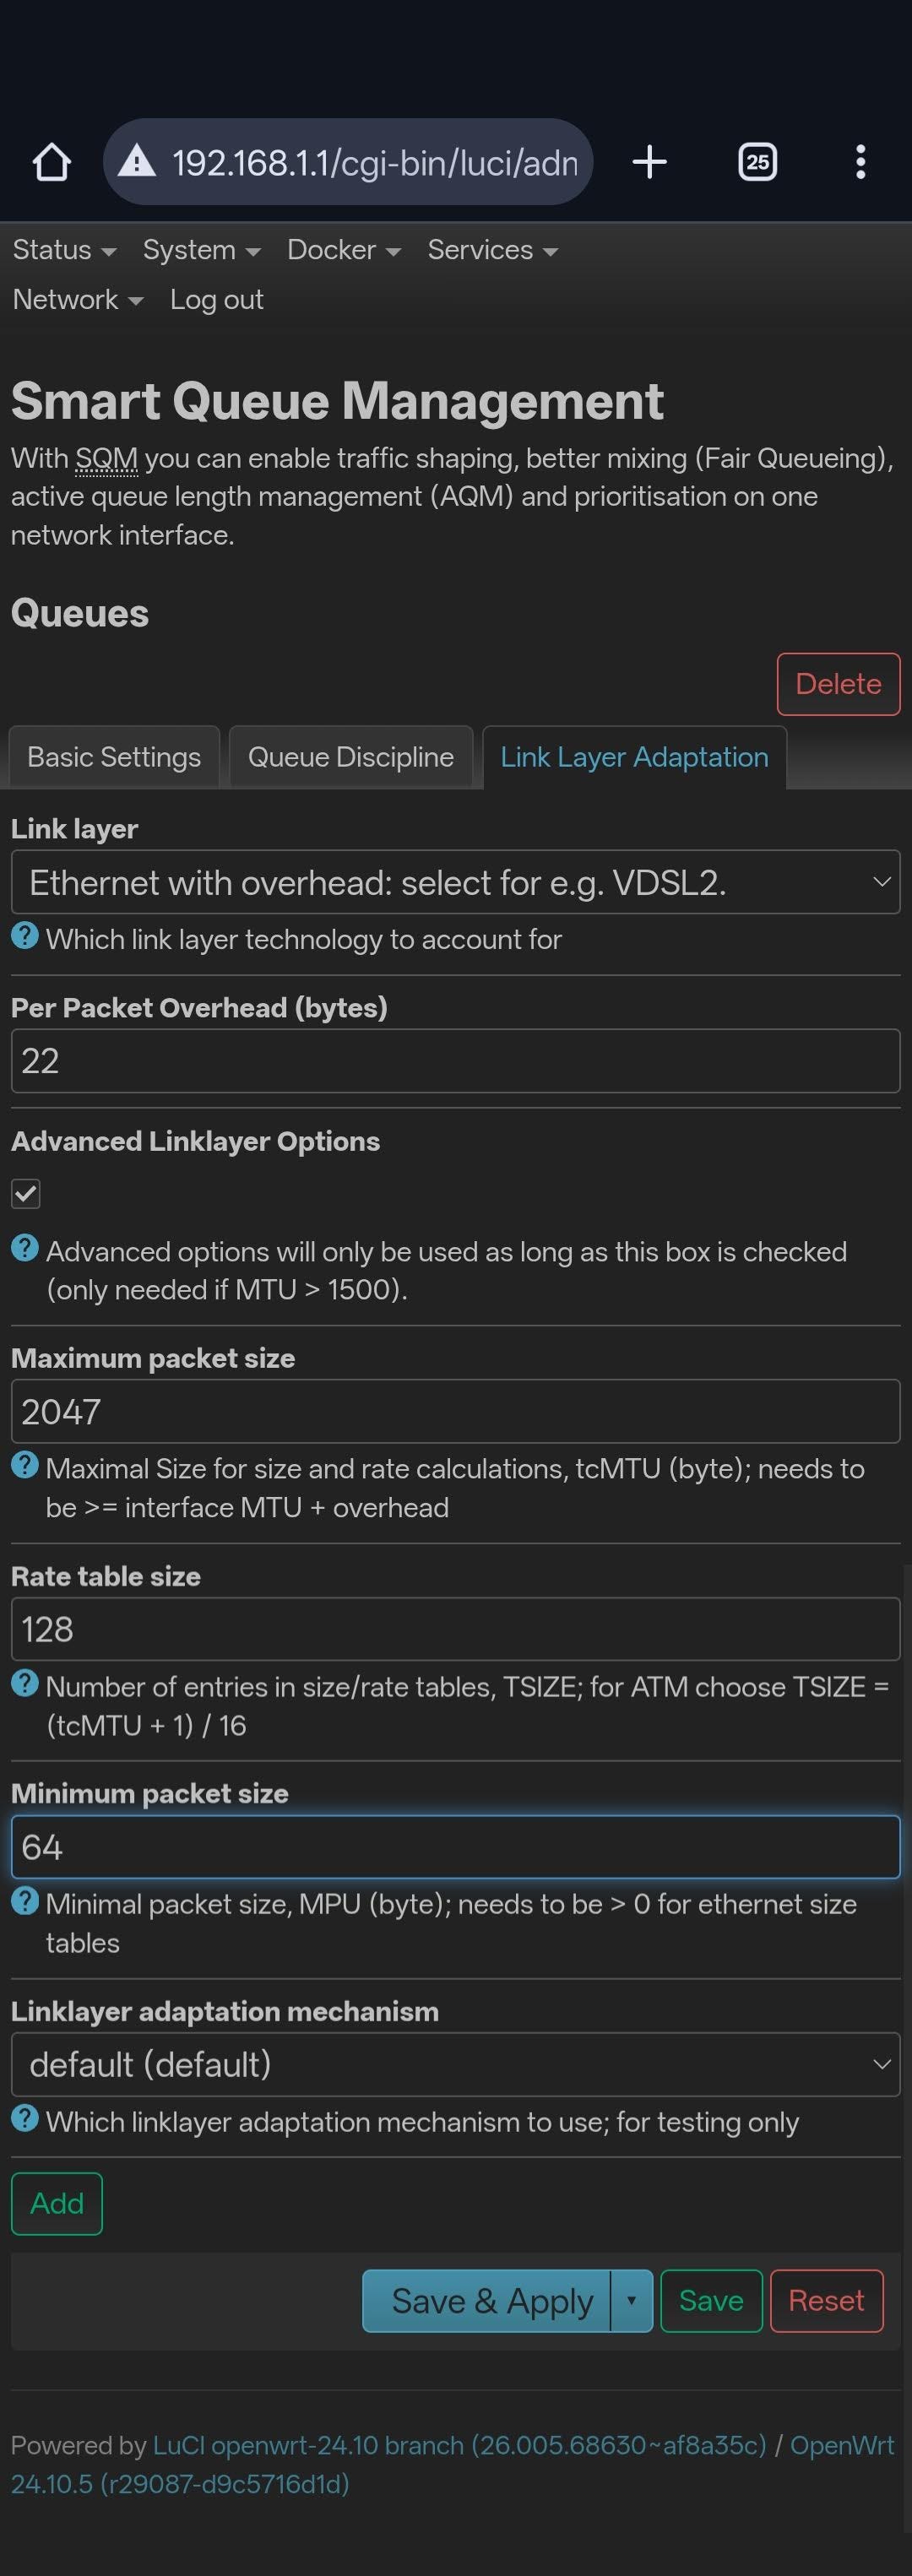
Link Layer Adaptation: This is where the fine-tuning happened. In the SQM settings, I enabled “Link Layer Adaptation.” Even though I am on a DOCSIS (Cable) connection, I used settings that added a small amount of packet overhead detection (Ethernet with overhead, 22 bytes).
Why do this? While DOCSIS doesn’t strictly require the same overhead calculations as DSL, adding this small “safety padding” ensures that packet sizes are calculated perfectly before they hit the wire. It acts as a buffer for the buffer.
Here is the exact configuration on the OpenWrt LuCI interface:
Pro Tip: Keeping the “Fast Lane” Clear with VLANs
To ensure my main OpenWrt Wi-Fi network stays streamlined, I segregated my IoT devices (smart plugs, sensors, cameras) onto the OpenWrt_IoT VLAN separated network. This does two things:
Security: If a cheap smart bulb gets hacked, the attacker is trapped in a quarantined VLAN and can’t access my personal computers.
Performance: Most IoT devices use older, slower Wi-Fi chips. By physically offloading them to a secondary AP, I prevent them from “clogging up” the precious airtime on my main Deco mesh. This leaves the high-speed 5GHz bands on the main network exclusively for my bandwidth-hungry devices like phones and laptops.

Bonus Tweak: DNS Optimization with AdGuard Home
Speed isn’t just about bandwidth; it’s also about how fast your browser can find the website you’re looking for. This is where DNS (Domain Name System) comes in.
To minimize the time it takes to resolve domain names, I ran a comprehensive DNS speed test to benchmark various providers against my specific location. The winner was clear: Cloudflare (1.1.1.1) consistently offered the lowest lookup times for my connection.

I immediately went into my AdGuard Home settings on my Home Lab and on the fallback router and changed the upstream DNS server to Cloudflare. Now, not only are ads and trackers are being blocked network-wide, but the “snappiness” of browsing—that feeling of a page starting to load the instant you hit enter—is noticeably sharper.
The Results: The Proof is in the Pudding
The tuning took some time, but the results speak for themselves. The network is now incredibly tight.
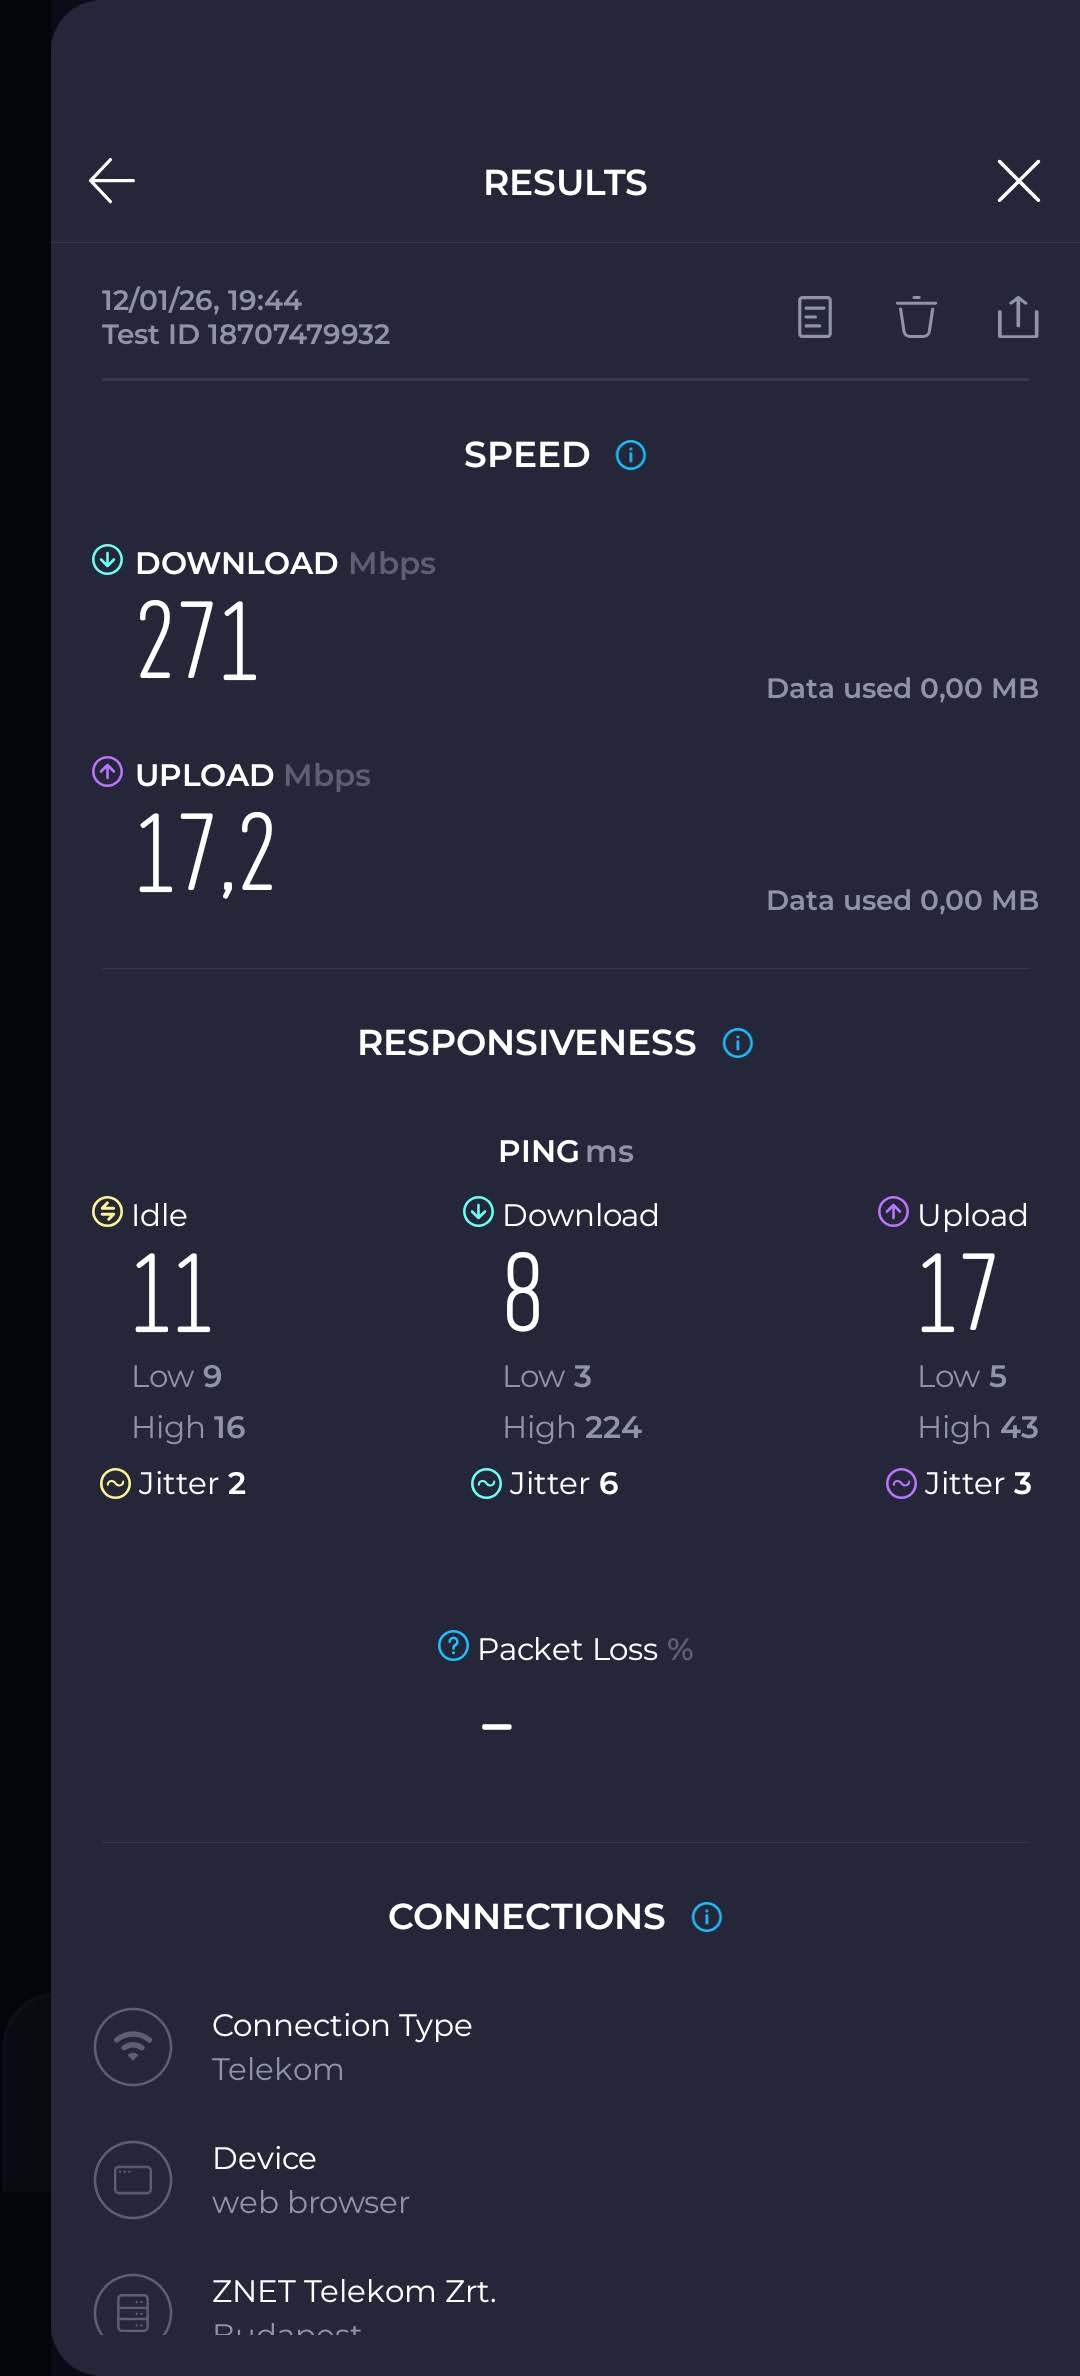
First, the standard Ookla speedtest. You can see I am hitting exactly the targets I set with the 90% rule: 271 Mbps download and 17.2 Mbps upload. The Raspberry Pi 4 handles this throughput without breaking a sweat. The charts were super flat as well.
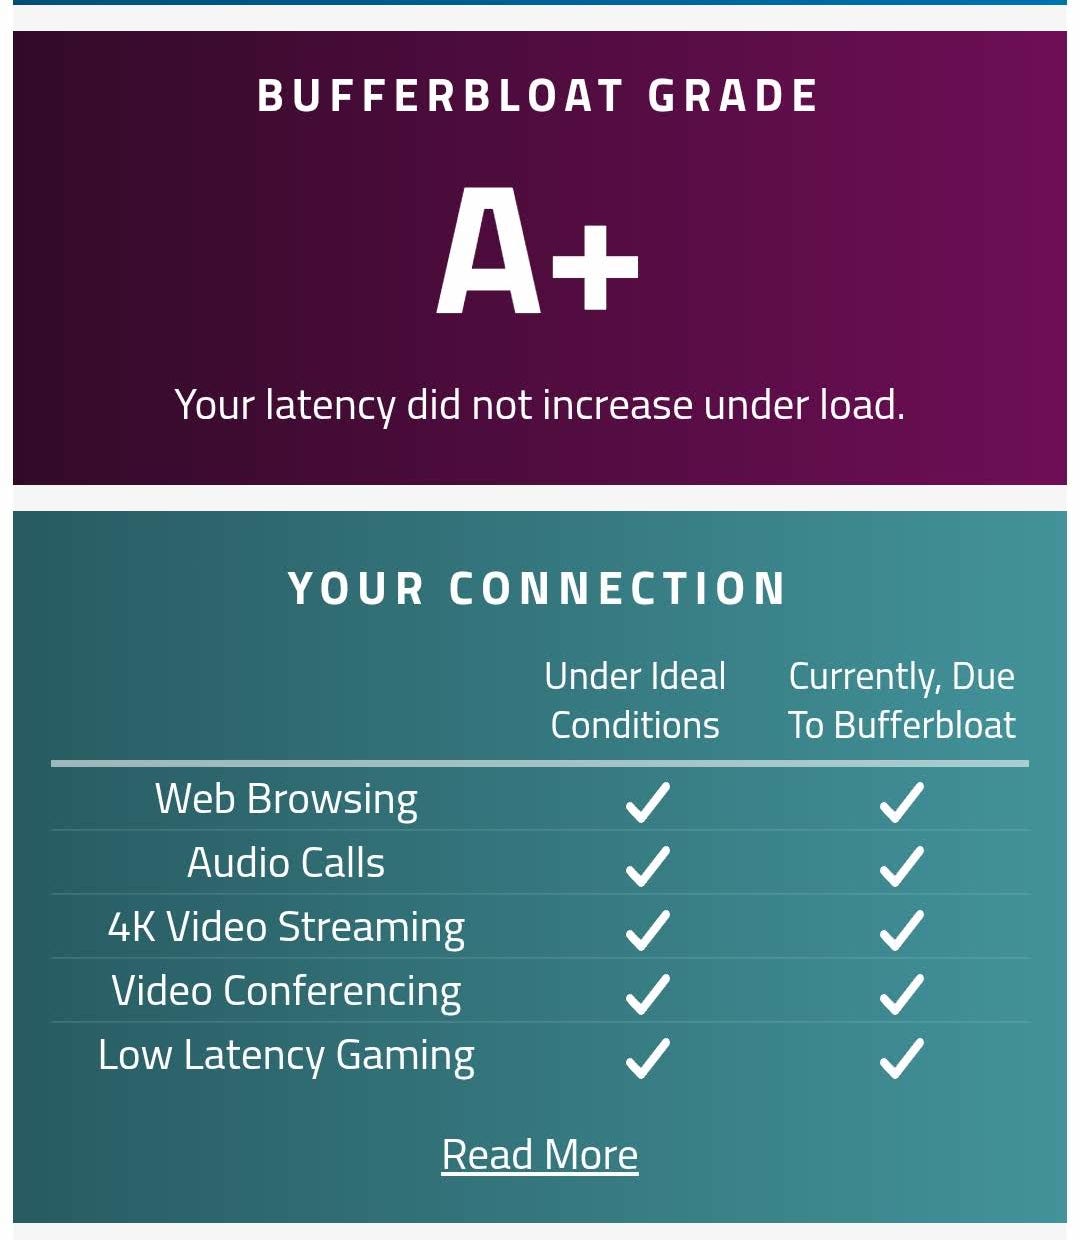
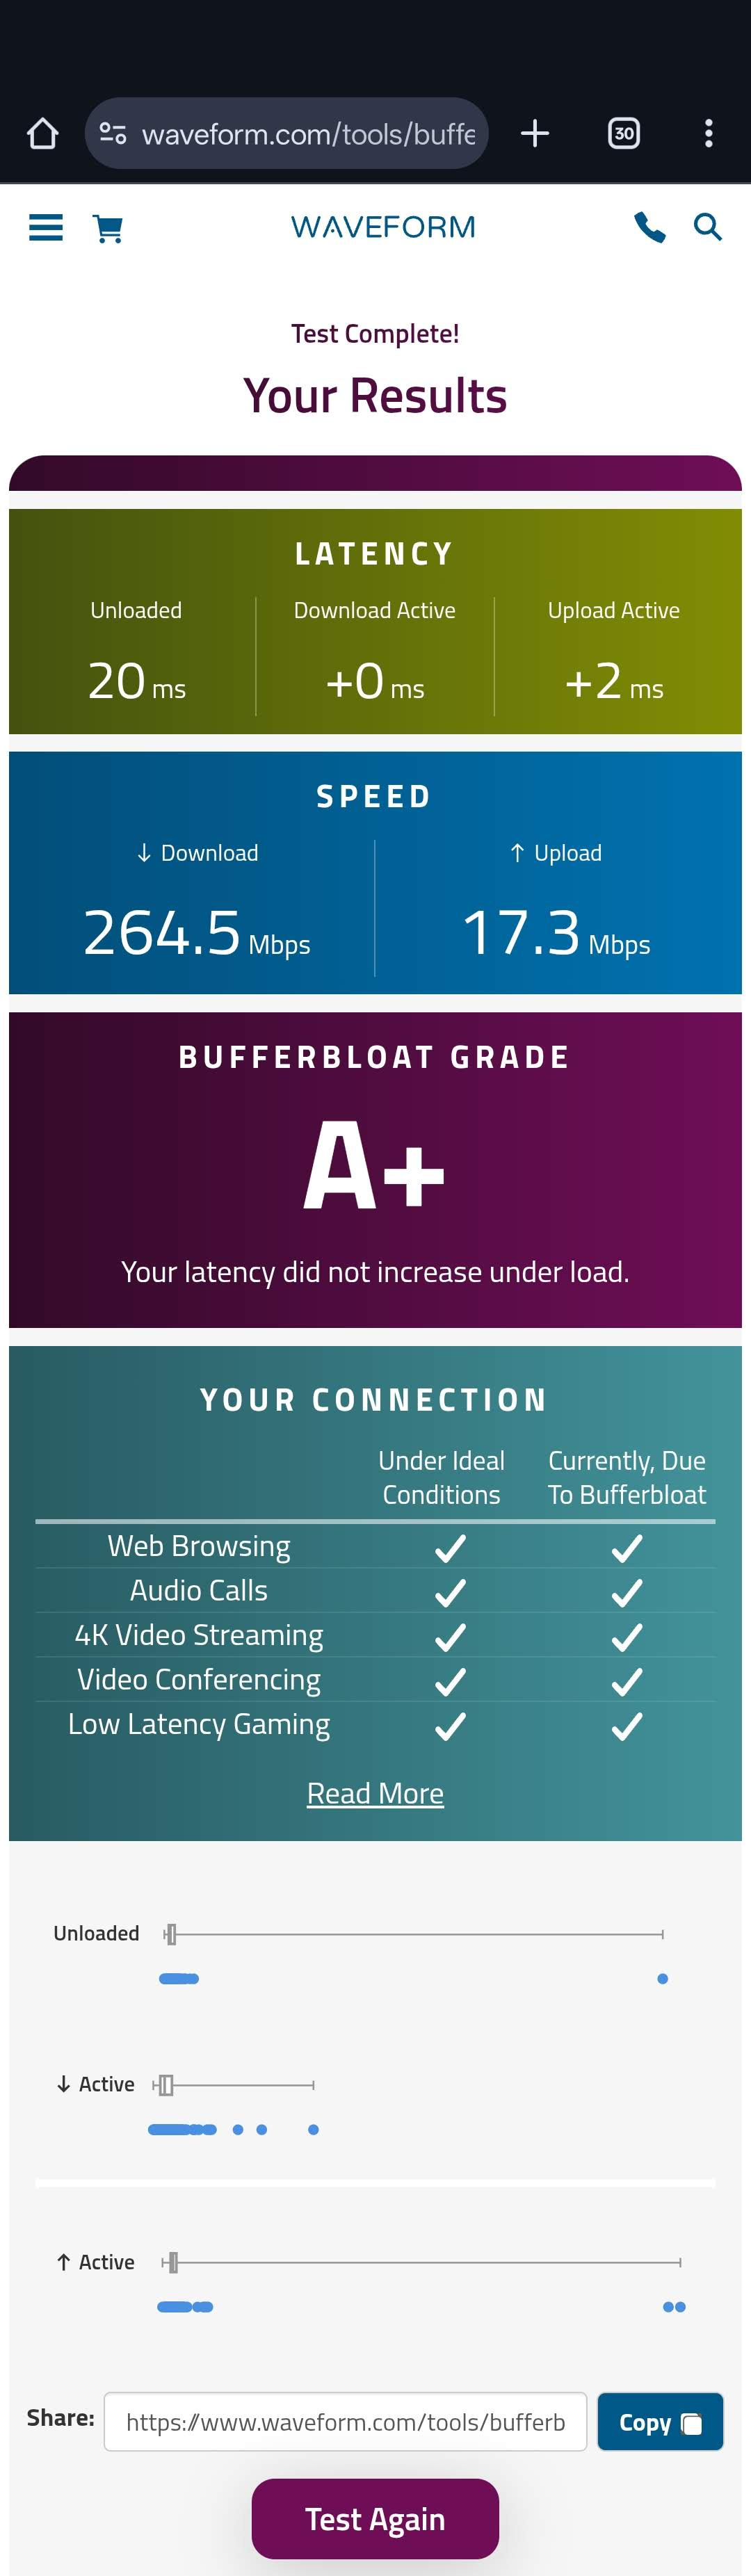
The Holy Grail: The A+ Bufferbloat Grade
The real test, however, is the Waveform Bufferbloat test. This measures what happens to your latency when the line is totally saturated.
Look at that grade: A+.
During the test, the real-time speedtest charts were unbelievably flat. Usually, when a download starts, you see the ping line spike upward. Mine stayed perfectly horizontal.
Unloaded Latency (20ms): My standard ping when the network is quiet.
Download Active (+0ms): This is the holy grail statistic. It means when I completely max out my 300Mbps download pipe, my latency does not increase at all.
Upload Active (+2ms): Maxing out my upload only adds a negligible 2ms of latency.
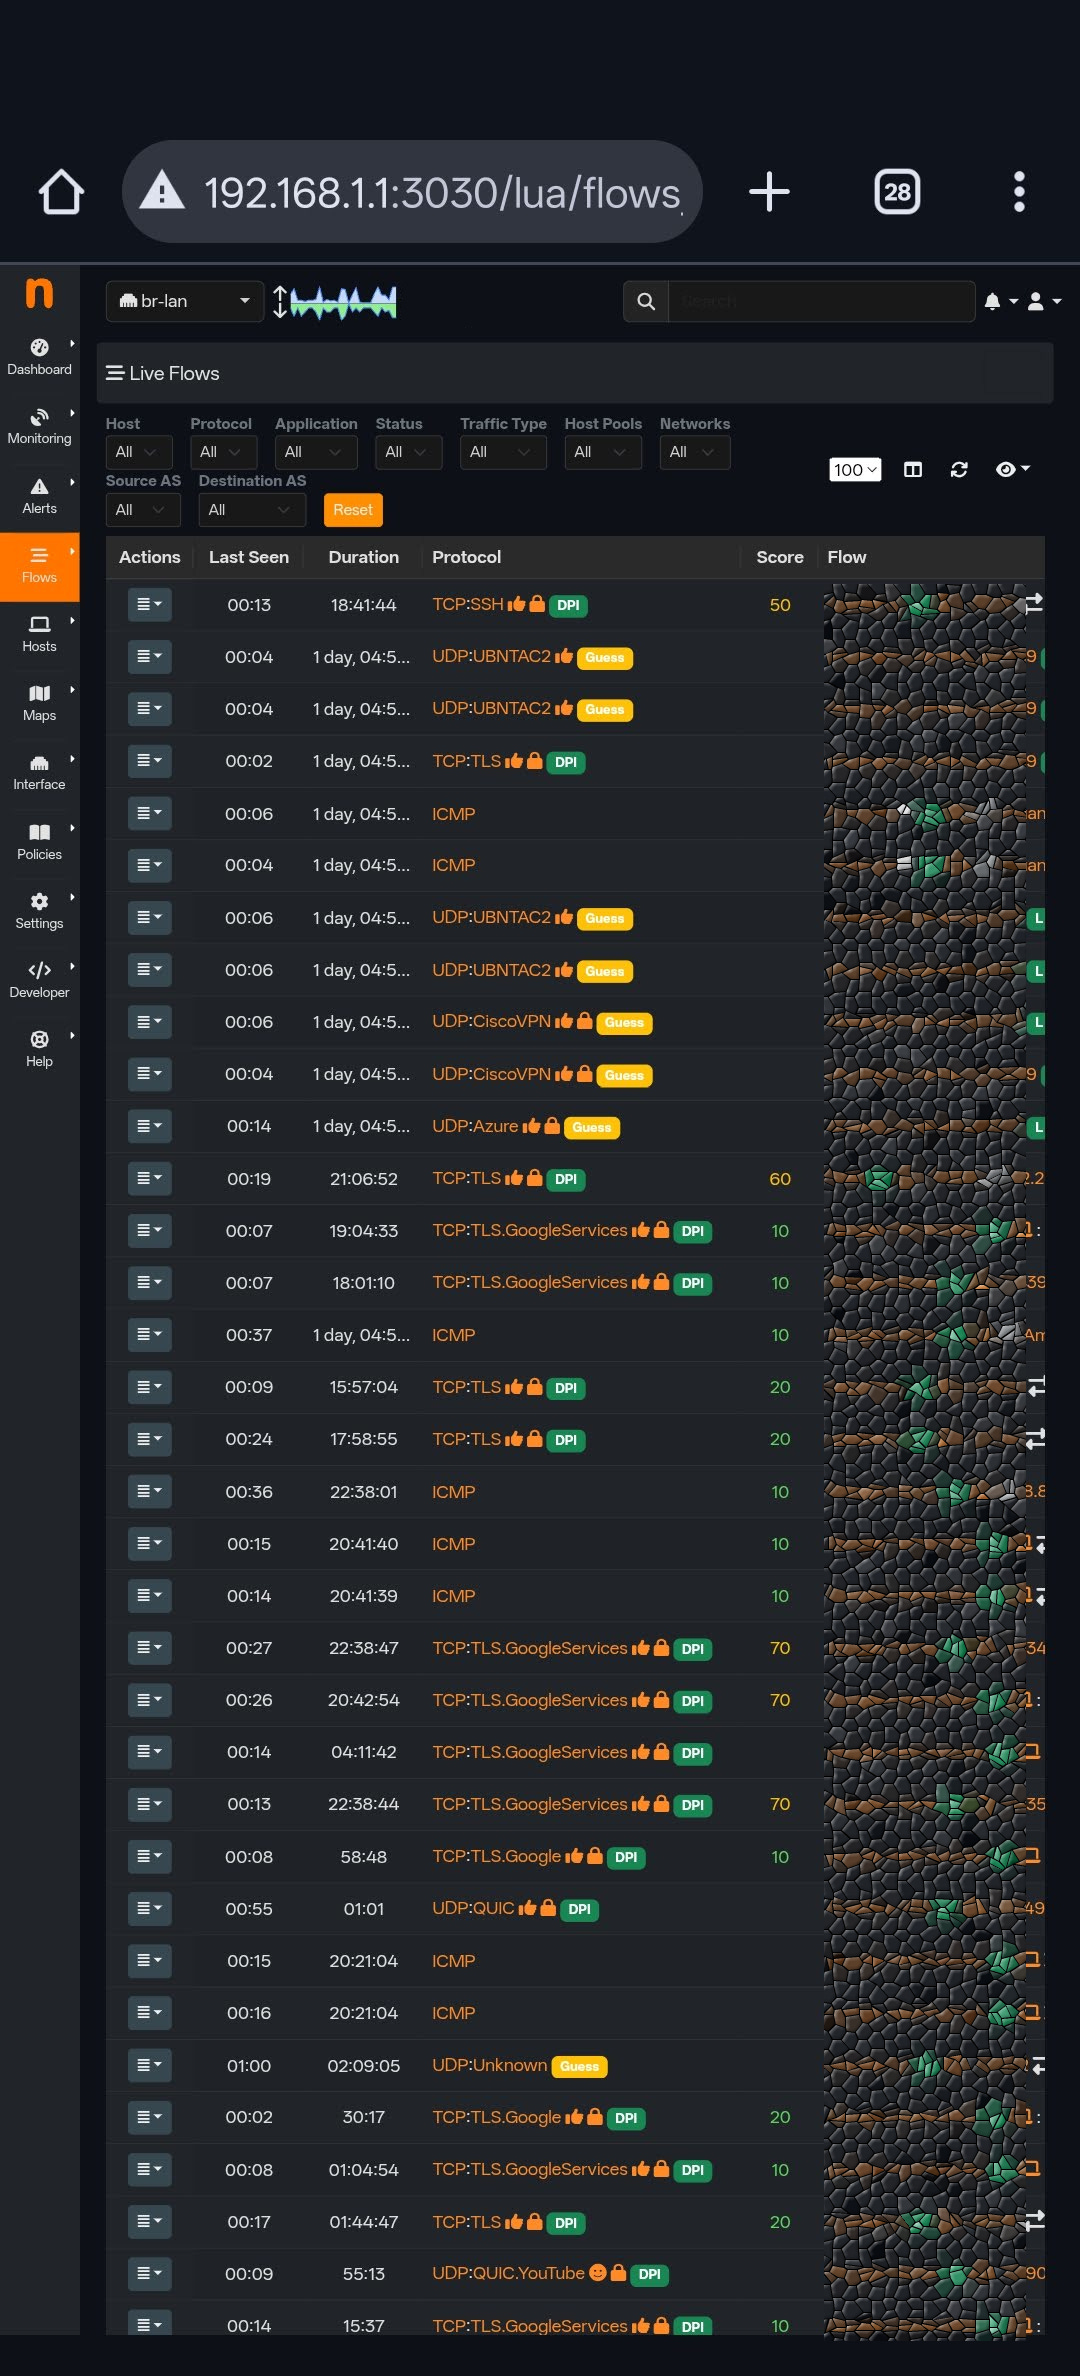
Stress Testing: Running ntopng in Background
☝️Here is the kicker: I achieved all of this while running ntopng on the router simultaneously.
For those who don’t know, ntopng is the Ferrari of traffic analyzers that provides real-time, high-speed web-based traffic analysis. It is resource-intensive software that monitors flows, protocols, and data usage in granular detail.
On a standard consumer router, enabling 7-layer deep packet inspection like this - IF it would be possible - would normally kill performance and introduce lag. The Raspberry Pi, however, didn’t flinch. It managed the heavy SQM calculations and the ntopng monitoring without dropping a single frame. This confirms that the RPi4 has plenty of overhead for enthusiasts who want total visibility into their network.
Conclusion
Before this setup, downloading a large game patch on Steam would make Teams calls stutter for everyone else in the house. Now, I can have a massive download running full blast while simultaneously being in a lag-free video call or playing a low-latency competitive game.
The combination of the Raspberry Pi 4’s processing power, wired backhaul for Wi-Fi APs, and precisely tuned SQM Cake has completely solved my internet connectivity issues.
Now if you experience Teams issues during a call with me,
you know the problem is not on my side… 😉